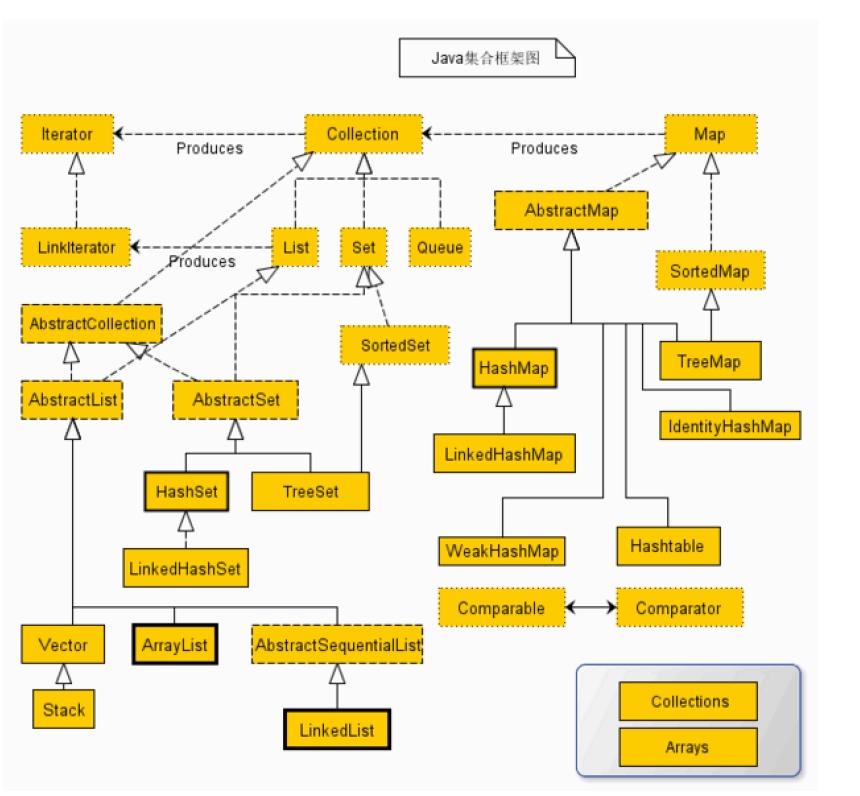
Java序列化(Serializable)与反序列化

序列化是干什么的

为了保存在内存中的各种对象的状态,并且可以把保存的对象状态再读出来。

序列化的几种方式

在Java中socket传输数据时,比较常见的做法有两种:

  • 把对象包装成JSON字符串传输
  • 采用Java对象的序列换与反序列化

Object Serialize

Java的序列化机制是通过在运行时判断类的serialVersionUID来验证版本一致性的。在进行反序列化时,JVM会把传来的字节流中的serialVersionUID与本地相应实体类的serialVersionUID进行比较,如果相同就认为是一致的,可以进行反序列化,否则就会出现序列化版本不一致的异常。

当两个进程在进行远程通信时,彼此可以发送各种类型的数据。无论是何种类型的数据,都会以二进制序列的形式在网络上传送。发送方需要把这个Java对象转换为字节序列,才能在网络上传送;接收方则需要把字节序列再恢复为Java对象

  • 把Java对象转换为字节序列的过程称为对象的序列化。
  • 把字节序列恢复为Java对象的过程称为对象的反序列化。

显示地定义serialVersionUID有两种用途:

  • 在某些场合,希望类的不同版本对序列化兼容,因此需要确保类的不同版本具有相同的serialVersionUID;在某些场合,不希望类的不同版本堆序列化兼容,因此需要确保类的不同版本具有不同的serialVersionUID
  • 当你序列化了一个类实例后,希望更改一个字段或者添加一个字段,不设置serialVersionUID,所做的任何更改都将导致无法反序列化旧的实例,并在反序列化时抛出一个异常。如果你添加了serialVersionUID,在反序列旧的实例时,新添加或者更改的字段值将设为初始化值,字段被删除将不设置。

Reference

http://mp.weixin.qq.com/s?__biz=MjM5NzMyMjAwMA==&mid=2651477035&idx=1&sn=617ab67ba4b3fa398ff0a8163eb0b7ac&scene=23&srcid=0411oESGwr6kfzJoeyPUPRWD#rd

2016/4/11 posted in  Java

Java基础之集合

一、HashSet

HashSet实现Set接口。HashSet中不允许有重复元素,这是因为HashSet是基于HashMap实现的,HashSet中的元素都存放在HashMapkey上面,而value中的值都是统一的一个private static final Object PRESENT = new Object();HashSetHashMap一样,都是一个存放链表的数组。具体看下HashSet怎样实现不允许有重复元素的。

/*
* @param e 将添加到此set中的元素。
* @return 如果此set尚未包含指定元素,则返回true。
*/
public boolean add(E e)
{
    return map.put(e, PRESENT)==null;
}

如果此set中尚未包含指定元素,则添加指定元素。更确切地讲,如果此set没有包含满足(e == null ? e2 == null : e.equals(e2))的元素e2,则向此set添加指定的元素e

如果此set已包含该元素,则该调用不更改set并返回false。底层实际将将该元素作为key放入HashMap。由于HashMapput()方法添加key-value对时,当新放入HashMapEntrykey与集合中原有Entrykey相同(hashCode()返回值相等,通过equals比较也返回true),新添加的Entryvalue会将覆盖原来Entryvalue,但 key不会有任何改变,因此如果向HashSet中添加一个已经存在的元素时,新添加的集合元素将不会被入HashMap中,原来的元素也不会有任何改变,这也就满足了Set中元素不重复的特性。

总结:不允许重复元素的本质是:当插入元素存在时,表面上看起来HashSet返回的是false,实际上执行的操作是原值被相同的值再覆盖一遍。

二、ArrayList

ArrayList 继承了AbstractList ,实现了List 。它是一个数组队列,相当于动态数组,提供了相关的添加、删除、修改、遍历等功能。

每个ArrayList 实例都有一个容量,该容量是指用来存储列表元素的数组的大小。它总是至少等于列表的大小。随着向ArrayList 中不断添加元素,其容量也自动增长。自动增长会带来数据向新数组的重新拷贝,因此,如果可预知数据量的多少,可在构造ArrayList 时指定其容量。在添加大量元素前,应用程序也可以使用 ensureCapacity 操作来增加ArrayList实例的容量,这可以减少递增式再分配的数量。

注意,此实现不是同步的。如果多个线程同时访问一个ArrayList 实例,而其中至少一个线程从结构上修改了列表,那么它必须保持外部同步。

1、ArrayList构造方法

ArrayList 提供了三种方式的构造器,可以构造一个默认初始容量为 10 的空列表、构造一个指定初始容量的空列表以及构造一个包含指定 collection 的元素的列表,这些元素按照该 collection 的迭代器返回它们的顺序排列的。源码如下:

public ArrayList()
{
    this(10);
}

public ArrayList(int initialCapacity)
{
    super();
    if (initialCapacity < 0)
        throw new IllegalArgumentException("Illegal Capacity: " + initialCapacity);
    this.elementData = new Object[initialCapacity];
}

public ArrayList(Collection c)
{
    elementData = c.toArray();
    size = elementData.length;
    // c.toArray might (incorrectly) not return Object[] (see 6260652)
    if (elementData.getClass() != Object[].class)
        elementData = Arrays.copyOf(elementData, size, Object[].class);
}

2、ArrayList 提供的各类方法

a、存储:

set(int index, E element)、add(E e)、add(int index, E element)、addAll(Collection<? extends E> c)、addAll(int index, Collection<? extends E> c)

b、读取:

get(int index)

c、删除:

remove(int index)、remove(Object o)【附:remove(Object o)方法移除此列表中首次出现的指定元素(如果存在),这是应为ArrayList中允许存放重复的元素】

注意:从数组中移除元素的操作,也会导致被移除的元素以后的所有元素的向左移动一个位置。

d、调整数组容量:

每当向数组中添加元素时,都会去检查添加后元素的个数是否会超出当前数组的长度,如果超出,数组将会进行扩容,以满足添加数据的需求。数组
扩容通过一个公开的方法 ensureCapacity(int minCapacity) 来实现。在实际添加大量元素前,也可以使用 ensureCapacity 来手动增加 ArrayList 实例的容量,以减少递增式再分配的数量。

public void ensureCapacity(int minCapacity)
{
    modCount++;
    int oldCapacity = elementData.length;
    if (minCapacity > oldCapacity)
    {
        Object oldData[] = elementData;
        int newCapacity = (oldCapacity * 3)/2 + 1;
        if (newCapacity < minCapacity)
        newCapacity = minCapacity;
        // minCapacity is usually close to size, so this is a win:
        elementData = Arrays.copyOf(elementData, newCapacity);
    }
}

数组进行扩容时,会将老数组中的元素重新拷贝一份到新的数组中,每次数组容量的增长大约是其原容量的 1.5 倍。这种操作的代价是很高的。因此在实际使用时,我们应该尽量避免数组容量的扩张。当我们可预知要保存的元素的多少时,要在构造 ArrayList 实例时,就指定其容量,以避免数组扩容的发生。或者根据实际需求,通过调用 ensureCapacity 方法来手动增加 ArrayList 实例的容量。

ArrayList 还给我们提供了将底层数组的容量调整为当前列表保存的实际元素的大小的功能。它可以通过 trimToSize 方法来实现。

3、Fail-Fast机制:

ArrayList 也采用了快速失败的机制,通过记录 modCount 参数来实现。在面对并发的修改时,迭代器很快就会完全失败,而不是冒着在将来某个不确定时间发生任意不确定行为的风险。

Fail-Fast机制: “快速失败” 也就是 fail-fast,它是 Java 集合的一种错误检测机制。当多个线程对集合进行结构上的改变的操作时,有可能会产生 fail-fast 机制。记住是有可能,而不是一定。例如:假设存在两个线程(线程 1、线程 2 ),线程1通过 Iterator 在遍历集合 A 中的元素,在某个时候线程 2 修改了集合 A 的结构(是结构上面的修改,而不是简单的修改集合元素的内容),那么这个时候程序就会抛出 ConcurrentModificationException 异常,从而产生 fail-fast 机制。】

三、Linkedlist

List 接口的链接列表实现。实现所有可选的列表操作,并且允许所有元素(包括 null)。除了实现 List 接口外,LinkedList 类还为在列表的开头及结尾 get、remove 和 insert 元素提供了统一的命名方法。这些操作允许将链接列表用作堆栈、队列或双端队列。 此类实现 Deque 接口,为 add、poll 提供先进先出队列操作,以及其他堆栈和双端队列操作。 所有操作都是按照双重链接列表的需要执行的。在列表中编索引的操作将从开头或结尾遍历列表(从靠近指定索引的一端)。

private transient Entry header = new Entry(null, null, null);

这个成员变量是LinkedList的关键,它在链表中没有实际数据意义,是链表的标示(通俗一点就是链表的第一个无意义的元素),而且被修饰为 transient,标示着他不会被序列化。header也可以当做队列末尾的元素,因为是双向列表,所以header.next末尾元素后边的元素就成了队首元素,header.previous就是队尾元素了,看一下它的添加方法

public void addFirst(E paramE)
{
    addBefore(paramE, this.header.next);//队首
}

public void addLast(E paramE)
{
    addBefore(paramE, this.header);//队尾
}

以上两个方法都利用 addBefore 方法将元素添加到指定对象之前,

addFirst 向队头加元素,将元素paramE添加到header.next-队首元素之前;

addLast 向队尾加元素,将元素paramE添加到header之前。

链表的基本特性是插入速度快,遍历速度慢。

LinkedList 的方法 entry(int index) 类似 ArrayList 的 get(int index),源码如下:

/***
* 根据序号获取Entry对象
*/
private Entry entry(int paramInt)
{
    if ((paramInt < 0) || (paramInt >= this.size))
    {
        throw new IndexOutOfBoundsException("Index: " + paramInt + ", Size: " + this.size);
    }
    Entry localEntry = this.header;
    int i;
    /***
    * 二分法:目标序号小于Size的1/2,则从头到尾
    * 如果大于Size的1/2,则从尾到头
    */
    if (paramInt < this.size >> 1)
    {
        for (i = 0; i <= paramInt; i++)
            localEntry = localEntry.next;
    }
    else
    {
        for (i = this.size; i > paramInt; i--)
            localEntry = localEntry.previous;
    }
    return localEntry;
}

四、 ArrayList 和 LinkedList 的区别

一般大家都知道 ArrayList 和 LinkedList 的大致区别:

1、ArrayList 是实现了基于动态数组的数据结构, LinkedList 基于链表的数据结构。

2、对于随机访问 get 和 set, ArrayList 觉得优于 LinkedList,因为 LinkedList 要移动指针。

3、对于新增和删除操作 add 和 remove, LinedList 比较占优势,因为 ArrayList 要移动数据。

ArrayList 和 LinkedList 在性能上各有优缺点,都有各自所适用的地方,总的说来可以描述如下:

1、对 ArrayList 和 LinkedList 而言,在列表末尾增加一个元素所花的开销都是固定的。对 ArrayList 而言,主要是在内部数组中增加一项,指向所添加的元素,偶尔可能会导致对数组重新进行分配;而对 LinkedList 而言,这个开销是统一的,分配一个内部 Entry 对象。

2、在 ArrayList 的中间插入或删除一个元素意味着这个列表中剩余的元素都会被移动;而在 LinkedList 的中间插入或删除一个元素的开销是固定的。

3、LinkedList 不支持高效的随机元素访问。

4、ArrayList 的空间浪费主要体现在在 list 列表的结尾预留一定的容量空间,而 LinkedList 的空间花费则体现在它的每一个元素都需要消耗相当的空间。可以这样说:当操作是在一列数据的后面添加数据而不是在前面或中间,并且需要随机地访问其中的元素时,使用 ArrayList 会提供比较好的性能;当你的操作是在一列数据的前面或中间添加或删除数据,并且按照顺序访问其中的元素时,就应该使用 LinkedList 了。

五、非同步性(非线程安全)

HashMap、Hashset、ArrayList、LinkedList 都是非同步性的,以 LinkedList 如果多个线程同时访问一个链接列表,而其中至少一个线程从结构上修改了该列表,则它必须保持外部同步。(结构修改指添加或删除一个或多个元素的任何操作;仅设置元素的值不是结构修改。)这一般通过对自然封装该列表的对象进行同步操作来完成。如果不存在这样的对象,则应该使用 Collections.synchronizedList 方法来“包装”该列表。最好在创建时完成这一操作,以防止对列表进行意外的不同步访问,如下所示:

List list = Collections.synchronizedList(new LinkedList(...));

同理,Map 有 Collections.synchronizedMap(Map m) 这个方法可以实现同步。

或者使用synchronized关键字

Reference

http://www.cnblogs.com/xwdreamer/archive/2012/06/03/2532999.html

http://zhangshixi.iteye.com/blog/674856

http://tan4836128.iteye.com/blog/1717809

2016/4/11 posted in  Java

Critical rendering path

Bytes -> Characters -> Tokens -> nodes -> Object Model
HTML markup is transformed into a Document Object Model (DOM), CSS markup is transformed into a CSS Object Model (CSSOM)
DOM and CSSOM are independent data structures

Document Object Model (DOM)

CSS Object Model (CSSOM)

While the browser was construncting the DOM of our simple page, it encoutered a link tag in the head section of the document referencing an external CSS stylesheet: style.css. Anticipating that it will need this resource to render the page, it immediately dispatches a request for this resource.

Just as with HTML, we need to convert the received CSS rules into something that the browser can understand and work with.

The first step is for the browser to combine the DOM and CSSOM into a "render tree" that captures all the visible DOM content on the page, plus all the CSSOM style information for each node.

To construct the render tree, the browser roughly does the following:

  • Starting at the root of the DOM tree, traverse each visible node.
    • Some nodes are not visible at all, and are omitted since they are not reflected in the rendered output
    • Some nodes are hidden via CSS and are also omitted from the render tree
  • For each visible node find the appropriate matching CSSOM rules and apply them
  • Emit visible nodes with content and their computed styles.

'visibility: hidden' is different from 'display: none'
'visibility: hidden' makes the element invisible, but the element still occupies space in the layout
'display: none' removes the element entirely from the render tree such that the element is invisible and is not part of layout


By default, CSS is treated as a render blocking resource
Media types and media queries allow us to mark some CSS resources as non-render blocking
All CSS resources, regardless of blocking or non-blocking behavior, are downloaded by the browser

<link href="style.css"    rel="stylesheet">
<link href="style.css"    rel="stylesheet" media="all">
<link href="portrait.css" rel="stylesheet" media="orientation:portrait">
<link href="print.css"    rel="stylesheet" media="print">
  • The first declaration is render blocking and matches in all conditions.
  • The second declaration is also render blocking: “all” is the default type and if you don’t specify any type, it’s implicitly set to “all”. Hence, the first and second declarations are actually equivalent.
  • The third declaration has a dynamic media query which will be evaluated when the page is being loaded. Depending on the orientation of the device when the page is being loaded, portrait.css may or may not be render blocking.
  • The last declaration is only applied when the page is being printed, hence it is not render blocking when the page is first loaded in the browser.

Adding interactivity with JavaScript

First, our script is executed at the exact point where it is inserted in the document. When the HTML parser encounters a script tag, it pauses its process of constructing the DOM and yields control over to the JavaScript engine; once the JavaScript engine has finished running, the browser then picks up from where it left off and resumes the DOM construction.

In other words, our script block can't find any elements later in the page because they haven't been processed yet.

Or, executing our inline script blocks DOM construction, which will also delay the initial render.

JavaScript execution can lead to significant delays in how quickly the browser can process and render our page on the screen:

  • The location of the script in the document is significant
  • DOM constrction is paused when a script tag is encountered and until the script has finished executing
  • JavaScirpt can query and modify the DOM and CSSOM
  • Javascript execution is delayed until the CSSOM is ready

Parser Blocking vs. Asynchronous JavaScript

By default, JavaScript execution is 'parser blocking': when the browser encounters a script in the document it must pause DOM construction, hand over the control to the JavaScript runtime and let the script execute before proceeding with DOM construction.

In the case of an external JavaScript file the browser will also have to pause and wait for the script to be fetched from disk, cache, or a remote server, which can add tens of thousands of milliseconds of delay to the critical rendering path.

Adding the async keyword to the script tag tells the browser that it should not block the DOM construction while it waits for the script to become available.

<script src="app.js" async></script>
2016/4/10 posted in  GoogleDevelopersWebFundamentals

Optimizing content efficiency

Text compression with GZIP

  • GZIP performs best on text-based assets: CSS, Javascript, HTML
  • All modern browsers support GZIP compresion and will automatically request it
  • Your server needs to be configured to enable GZIP compression
  • Some CDNs require special care to ensure that GZIP is enabled

There are cases where GZIP can increase the size of the asset. Typically, this happens when the asset is very small and the overhead of the GZIP dictionary is higher than the comression saving.

Validating cached responses with ETags

First, the browser checks the local cache and finds the previous response, unfortunately it cannot use it as the response has now "expired".

At this point it could simply dispatch a new request and fetch the new full response, but that's inefficient because if the resource has not changed then there is no reason to download the exact same bytes that are already in cache.

That's the problem that validation tokens, as specified in the ETag header, are designed to solve: the server generates and returns an arbitrary token which is typically a hash or some other fingerprint of the contents of the file. If the fingerprint is still the same then the resource has not changed and we can skip the download.

The client automatically provides the ETag token within the "If-None-Match" HTTP request header, the server checks the token against the current resource, and if it has not changed returns a "304 Not Modified" response which tells the browser that the response it has in cache has not changed and can be renewed for another 120 seconds.

Cache-Control

The best request is a request that does not need to communication with the server: a local copy of the response allows us to eliminate all network latency and avoid data charges for the data transfer.

"no-cache" and "no-store"

"no-cache": If a proper validation token (ETag) is present, no-cache will incur a roundtrip to validate the cached response, but can eliminate the download if the resource has not changed.

"no-store": It disallows the browser and all intermediate caches to store any version of the returned response. Everytime the user requests this asset, a request is sent to the server and a full response is downloaded each and every time.

"private" vs. "public"

"public": it can be cached, even if it has HTTP authentication associated with it, and even when the response status code isn't normally cacheable.

"private": can be cached by user's browser, but not by a CDN

"max-age"

specifies the maximum time in seconds that the fetched response is allowed to be reused for from the tiem of the request

max-age=60 // response can be cached and reused for the next 60 seconds

Invalidating and updating cached response

All HTTP requests made by the browser are first routed to the browser cache to check if there is a valid cached response that can be used to fulfill the request. If there is a match, the response is read from the cache and we eliminate both the network latency and the data costs incurred by the transfer.

We can change the URL of the resource and force the user to download the new response whenever its content changes.

2016/4/10 posted in  GoogleDevelopersWebFundamentals

Instruct search engines how your multi-device page is structured

Determine URL structure of your webpage

Responsive Web Design

serves the same HTML for one URL and uses CS media quries to determine how the content is rendered on the client side.

Desktop and Mobile: http://www.example.com/
Separate mobile site

redirects users to a different URL depending on the user-agent

Desktop: http://www.example.com/
Mobile: http://m.example.com/
Dynamic serving

serves different HTML for one URL depending on the user-agent

Desktop and Mobile: http://www.example.com/

The best approach we recommend is to use responsive web design

Using link[rel=canonical] and link[rel=alternate] when serving from separate URLs

Serving similar contents on a desktop version and a mobile version at different URLs may cause confusion for both users and sertch engines because it's not obvious for viewers that they are intended to be identical. You should indicate:

  • Contents of those 2 URLs are identical
  • Which is mobile version
  • Which is desktop version

This information can help search engines better index content and ensure users find what they're looking for in a format that works for their device.

Use link[rel=alternate] for desktop version

On desktop page, indicate that there's a mobile version on a different URL by adding link tag with rel="alternate" pointing to mobile version URL with href. By adding media attribute with value of "only screen and (max-width: 640px)" will help search engines understand that this is explicitly targeting small screens.

<title>...</title>
<link rel="alternate" media="only screen and (max-width: 640px)" href="http://m.example.com/">
Use link[rel=canonical] for mobile version

On mobile specific pages, indicate that there's a desktop version at a different URL by adding link tag with rel="canonical" pointing to desktop version URL with href.

<title>...</title>
<link rel="canonical" href="http://www.example.com/">

Use Vary HTTP header for device oriented serving site

By letting search engines know that the content varies depending on user agent, they can optimize search results for the user agent that is sending queries.

Use Vary HTTP header
HTTP/1.1 200 OK
Content-Type: text/html
Vary: User-Agent
Content-Length: 5710
2016/4/10 posted in  GoogleDevelopersWebFundamentals